 Saw this on the internet a few days ago and I thought it was rather interesting. Maybe I'll do the same for one ofmy kits
Monday, September 6, 2010
McGundam
Saw this on the internet a few days ago and I thought it was rather interesting. Maybe I'll do the same for one ofmy kits
SD Freedom W.I.P
Here's what I've done to the SD Freedom Gundam so far

Used some tape to cover the areas so I won't go over it with paints

Looks a little unprofessional but hey, it's my 1st time.

This is the end result. Not too bad for a 1st timer.
Sunday, September 5, 2010
What I have.....
Alright guys, in this post I'm gonna show you what kind of tools and paints that I'll be using to get started on my Gundam kits

Here's the full picture of all the things I've acquired
 From Left to Right: Gaia thinner for airbrushing, Gaia heavy duty thinner for cleaning tool ONLY, Gaia thinner for brush painting & Tamiya Enamel thinner for panel lining
  From Left to Rght: Mr. Super clear gloss coat, Mr Surfacer 1200, Coarse compound, Fine compound, Finish compound & Tape for covering parts that do no need painting. Metal dish for mixing colours and 28pcs crocodile clip.
 From Left to Right: Scribbing tool, Cutter, Hobby knife, brushes in various sizes, stirrer and pipette.
 Bottom row from Left to Right: Tamiya Black enamel, Tamiya German grey enamel, Gaia white, Gaia clear flourescent blue, Gaia clear flourescent pink, Gaia black, Mr Hobby grey, Mr. Hobby Gundam red.
Top row from Left to Right: Gaia cobalt blue, Gaia primary yellow, Gaia silver & Mr. Hobby gold.
Markers: Gold, silver & panel lining marker.
I've started work on the SD Freedom Gundam today. What I did was to remove all the parts from the tree and sanding down all the ends to make it smooth, after that i wet-sand all the pieces with a 1000 grit sand paper and finally wash them with soapy water. Right now they're sitting in the room to dry. Hopefully tonight i can start to decide how to go about painting them.
That's all the updates for now.
Friday, September 3, 2010
New buys
Sorry for the lack of updates, been quite busy recently with work.
Anyway, bought quite a few stuffs today.
Got myself some brushes, paints and a scribber. I also got myself 2 new SD Gundam kits, Strike Gundam and the OO Raiser.
Anyway, bought quite a few stuffs today.
Got myself some brushes, paints and a scribber. I also got myself 2 new SD Gundam kits, Strike Gundam and the OO Raiser.

Strike Gundam
 OO Raiser
I've kinda started on the strike but I'll need to get more stuffs from H.A.G before i could finish it.
So stay tuned or further updates
Monday, August 2, 2010
Tiramisu
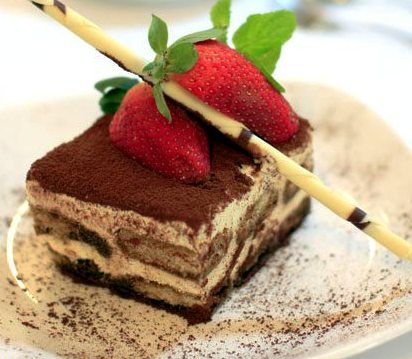
Tiramisu, an Italian dessert which means 'Pick me up'.
Today I'm gonna teach you how to make a really simple and delicious Tiramisu dessert.
Serving size: 16
What you'll need:
Lady finger biscuits: 7 pkt, each packet has 6pcs of biscuit
Mascarpone cheese: 500g
Coffee or espresso:300ml
Egg yolks: 5nos
Sugar: 5 tbsp
Marsala wine or Brandy: 100ml-150ml
Whipping cream: 500ml
Method
- Beat the yolks and sugar till it turns fluffy in a mixer at medium speed, add in the mascarpone cheese into the mix and turn the speed down. Allow it to mix properly. Finally, add the Marsala wine/brandy into the mixture.
- In a separate bowl, whip the cream till it turns creamy and fluffy. Fold the whipped cream into the yolk and mascarpone cheese mix.
- Take a serving dish and spread a layer of the mix unto the dish, dip the lady finger into the coffee and shake to get rid of excess coffee. Place the biscuit unto the layer of cream till it's completely covered. Repeat by adding another layer of the cream unto the biscuit and layer the cream with the biscuit again. Finish off with a final coat of cream and allow to chill in the chiller for 30mins.
- When about to serve, sprinkle cocoa powder over the top and use any fruits or berries as garnish.
Note: You may add sugar to the coffee if you do not want the biscuit to be too bitter.
Note: When you lay the lady finger biscuits, lay the first layer pointing upwards and the second layer pointing sideways or vice versa.
Getting started
A few weeks ago I 'bumped' into this blog by Kenny Lim on Gunpla. It really got me excited and wanting to take up the hobby again after 16 years since I last did any Gundam model kit.
So I went ahead to get myself a SD Strike Freedom Gundam to brush up on my skills and I got a 1/60 PG Red Frame Astray at a really good price to do when I'm ready for some serious airbrushing.

The PG Astray that I got comes with the additional bonus clear parts and extra katana. This 'Special Edition' set is only available for the very first batch of PG Astray.


This is the SD Strike Freedom that I got as well


That's all for my very first post for model kits, maybe in the next post I'll upload some pics of my toy collections.
Subscribe to:
Comments (Atom)